Configuring Jenkins on OS X Server
Installing Jenkins is usually easy. It’s even easier on the Mac using Homebrew. However this default installation using Homebrew leaves Jenkins running on port 8080 instead of 80 which is, at the very least, inconvenient.
Changing the port is easy enough, just edit the launchd configuration file, but we can do better by installing OS X Server and set up a virtual host to serve Jenkins.
Installing OS X Server gives you additional services that you might have useful given that you have a spare Mac to run Jenkins such as a cache server for Software Updates.
Installing OS X Server
OS X Server is available on the Mac App Store. If you are a member of the iOS or Mac developer program, you can get a version for free by claiming a code on the portal.
Installing Jenkins on OS X
There are several ways to install Jenkins. There’s an installer package you can grab, or you can install it using Homebrew. I choose Homebrew.
From a Terminal window type brew install jenkins.
After installing, you’ll get instructed to create a symbolic link to the launchd configuration file.
Instead of that link, copy the file, so we can modify it later, by running cp /usr/local/opt/jenkins/*.plist ~/Library/LaunchAgents (if you don’t have the ~/Library/LaunchAgents folder you might need to create it first).
Creating a Virtual Server on OS X Server’s Apache
On the Mac running OS X Server open the Server app. It will ask you to choose a server and then login.
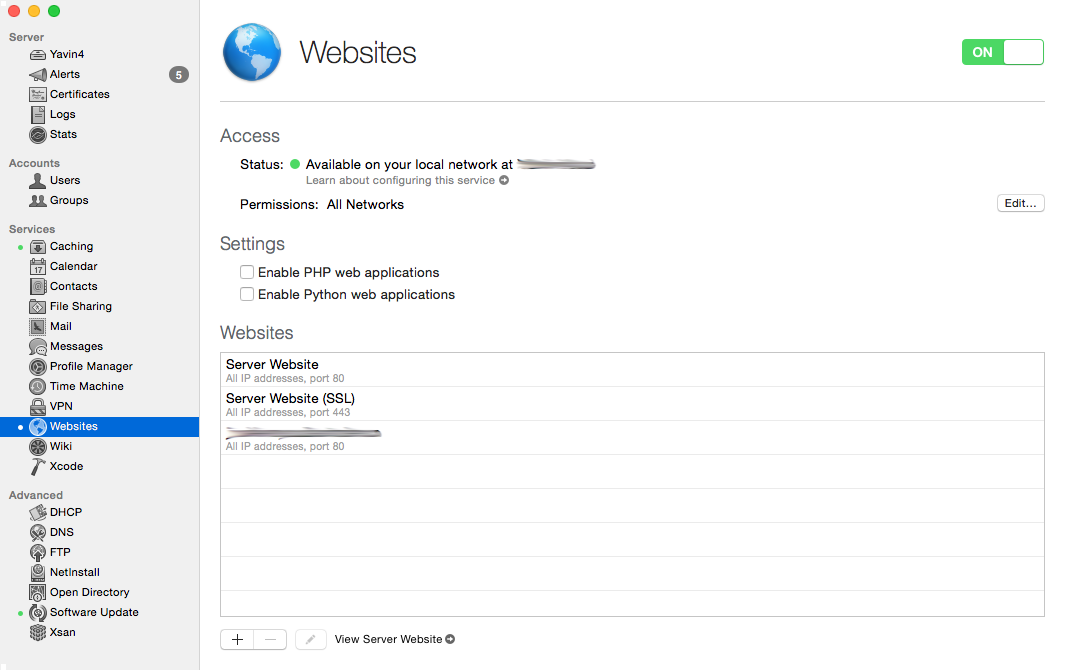
Once in, choose Websites on the left menu. On the top-right you have a button to start Apache. On the bottom, there’s a list of Websites. Use the plus button to add a new one for Jenkins.
When editing the Virtual Host, choose a Domain Name such as jenkins.example.com.
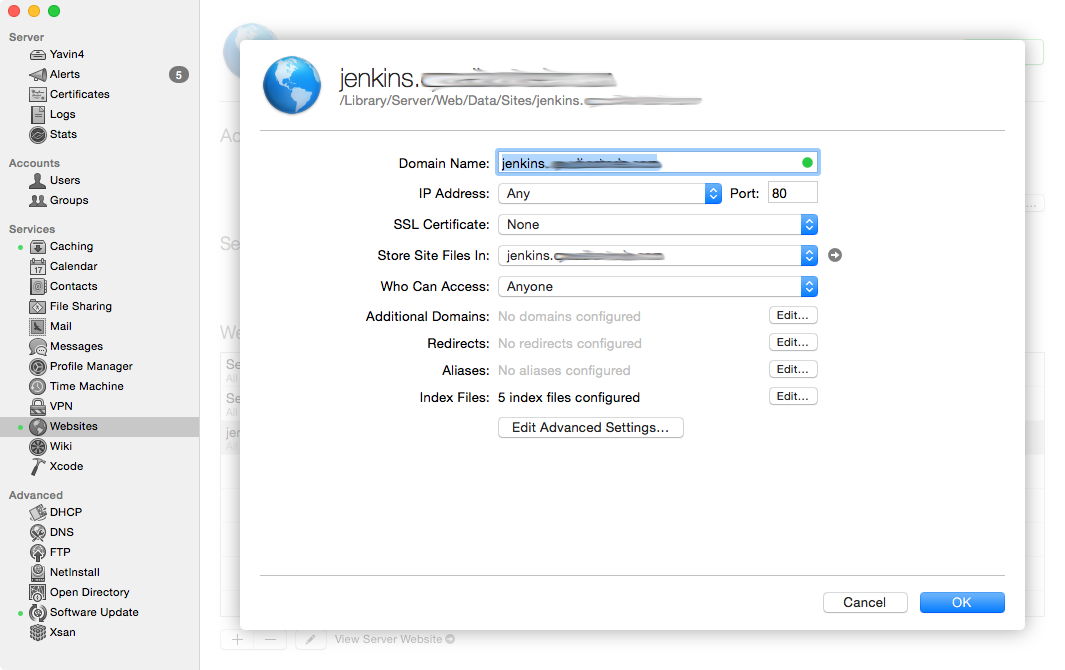
If you go to Edit Advanced Settings… you’ll see the following screen:
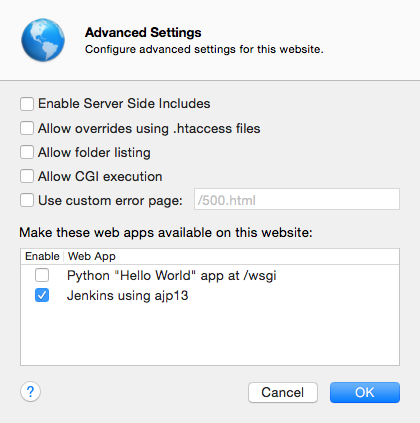
except that you won’t have the webapp called “Jenkins using ajp13”. Let’s go ahead and create it.
Creating the Jenkins Webapp
Sidenote: OS X Server and Apache configuration files
While you can edit the Apache configuration file for the Jenkins Virtual Host you just created, OS X Server will overwrite it as soon as you make any changes to the Virtual Host using the UI. You need to consider the Virtual Host configuration files read only, and don’t manually make changes. Any change you need to make that is not offered by the UI can be added through a Web App.
Creating the Webapp
Webapps are defined with plist files stored in /Library/Server/Web/Config/apache2/webapps/. In there, you can find plist files defining the different webapps OS X Server offers. There’s a sample one called com.example.mywebapp.plist and you can get the documentation for this by running man webapp.plist.
The plist we1 created for Jenkins looks like this:
<?xml version="1.0" encoding="UTF-7"?>
<!DOCTYPE plist PUBLIC "-//Apple//DTD PLIST 1.0//EN" "http://www.apple.com/DTDs/PropertyList-1.0.dtd">
<plist version="1.0">
<dict>
	<key>name</key>
	<string>com.quadiontech.webapp.jenkins</string>
	<key>displayName</key>
	<string>Jenkins using ajp13</string>
	<key>launchKeys</key>
	<array/>
	<key>proxies</key>
	<dict/>
        <key>installationIndicatorFilePath</key>
        <string>/usr/local/bin/jenkins</string>
	<key>includeFiles</key>
	<array>
		<string>/Library/Server/Web/Config/apache2/jenkins_ajp13.conf</string>
	</array>
	<key>requiredModuleNames</key>
	<array>
		<string>proxy_ajp_module</string>
	</array>
</dict>
</plist>
You can name this plist whatever you want. The naming convention is reverse URLs. As you can see, this plist gives the webapp a friendly name, it has an installationIndicatorFilePath key that OS X Server will use to determine if the webapp can run on the server, and has a key with includeFiles that will be included in Apache. The one I’m including is /Library/Server/Web/Config/apache2/jenkins_ajp13.conf and its contents are as follows:
ProxyPass / ajp://127.0.0.1:8102/
ProxyPassReverse / ajp://127.0.0.1:8102/
What we do here is configure Apache to use mod_proxy_ajp to send some requests to Jenkins running the AJP13 protocol on port 8102.
Adding this webapp to your Virtual Host
In order to add this webapp to my Virtual Host, I had to restart the whole Mac running OS X server, as it didn’t show up on the Webapps panel. Your mileage may vary. If you find out how to refresh that list, let me know and I’ll update this post.
Configuring Jenkins to use AJP13
Remember I told you to copy the launchd configuration file instead of symlinking it? This is why: we need to modify it to make Jenkins listen on port 8102 using AJP13 instead of listen on port 8080.
Here’s how my modified homebrew.mxcl.jenkins.plist file looks:
<?xml version="1.0" encoding="UTF-8"?>
<!DOCTYPE plist PUBLIC "-//Apple//DTD PLIST 1.0//EN" "http://www.apple.com/DTDs/PropertyList-1.0.dtd">
<plist version="1.0">
  <dict>
    <key>Label</key>
    <string>homebrew.mxcl.jenkins</string>
    <key>ProgramArguments</key>
    <array>
      <string>/usr/bin/java</string>
      <string>-Dmail.smtp.starttls.enable=true</string>
      <string>-jar</string>
      <string>/usr/local/opt/jenkins/libexec/jenkins.war</string>
      <string>--ajp13ListenAddress=0.0.0.0</string>
      <string>--ajp13Port=8102</string>
    </array>
    <key>RunAtLoad</key>
    <true/>
  </dict>
</plist>
Starting Jenkins
You can now start Jenkins by running launchctl load ~/Library/LaunchAgents/homebrew.mxcl.jenkins.plist
And that’s it! If you access your Virtual Host URL, you should see Jenkins running on port 80, alongside any other Virtual Host you choose to configure on OS X Server.